
How to Build a Gaming Network

People throw around “gaming network” like it means one thing. It doesn’t. It covers three completely different setups, and they share almost nothing in common except the word.
One person says it and they mean fixing their home Wi-Fi so Fortnite stops lagging. Another means hosting a Minecraft server for their mates. A third means running infrastructure for an actual community with players in five countries. Same phrase, wildly different builds.
Sort out which one you’re actually doing before you spend a penny. That’s the part most guides skip, and it’s the part that decides whether you waste a weekend or a month’s salary.
Work Out What You’re Building
Three rough buckets. They don’t really overlap.
- Home setup. You want your own gaming to feel smooth. Low ping, no Wi-Fi drops, no chaos when someone else in the house starts a download mid-match. This is mostly a router and cabling job. Takes an afternoon if you’ve got the gear.
- Dedicated game server. You want to run a Minecraft world, an ARK cluster, a Valheim map something persistent that friends connect to. This needs a machine (yours or rented), proper server software, and a sensible way to handle incoming connections.
- Cloud-scale hosting. You’re running a community or something close to a small project. Players are spread across regions, latency genuinely matters, and you need real infrastructure containerised hosting, distributed servers, the works.
Be honest with yourself here. Most people asking this question are in the first or second bucket. The third one is a different kind of effort and a different kind of bill.
Quick reference checklist:
| Component | Goal | Action |
|---|---|---|
| Speed | Low ping | Wired Ethernet, 5GHz Wi-Fi minimum |
| Router | Stability | Enable Gaming QoS, fix bufferbloat |
| Server | Availability | Docker or Pterodactyl for management |
| Privacy | Don’t expose home IP | playit.gg or Cloudflare Tunnel |
| Security | Don’t get hacked | Non-root user, firewall, updates, SSH keys |
| Scale | Reach players globally | Pick server location near your community |
Hardware That Matches the Job
Home Setup Gear
You don’t need a server for this. You need a router that isn’t garbage and Ethernet running to wherever you actually play.
- A modern router with QoS (Quality of Service) support anything from ASUS, TP-Link Omada, Ubiquiti, or MikroTik will do the job.
- Cat 6 or Cat 6a Ethernet cable from router to Gaming PC Cat 5e technically works but Cat 6 is barely more expensive.
- A managed switch if you’ve got several wired devices in the same room, otherwise skip it.
If running cable is genuinely impossible, use 5GHz Wi-Fi rather than 2.4GHz. The 2.4 band is slow, crowded, and shares space with every microwave and Bluetooth gadget in the building. Wi-Fi 6 or 6E is the realistic standard in 2026.
Dedicated Server Gear

This depends entirely on what you’re hosting. A four-player Minecraft world will run on a Raspberry Pi. A 50-slot modded ARK server will absolutely chew through a normal desktop.
Reasonable guidance:
- CPU: Single-thread speed matters more than core count for most game servers. A modern 6-core handles small and mid-sized servers easily. Minecraft in particular is single-threaded and loves fast cores.
- RAM: 16GB is the floor for anything serious. 32GB if you’re running multiple instances or heavily modded games.
- Storage: NVMe SSD, not a question. Game servers hammer the disk constantly and HDDs become the bottleneck before anything else does.
- Network: Gigabit is enough for almost every home-hosted scenario. 10 GbE only matters if you’re running a lab or hosting multiple servers off one machine and at that point you also need Cat 6a cabling and a 10 GbE switch to actually use it.
Cloud Hosting
You’re renting, not buying. The decision that matters here is where your players are, not where you are. A server in Frankfurt is useless if most of your community plays from São Paulo. Pick the region first, then the provider.
Make the Network Itself Behave
Home or hosted, a few settings reliably make things better.
Turn on QoS. This tells your router that small, frequent gaming packets matter more than someone’s cloud backup. Most modern routers have a “Gaming Mode” or “Adaptive QoS” toggle that handles this automatically. If yours doesn’t, you can usually set custom rules by device or port.
Fix your bufferbloat. This is the thing that takes your ping from 20ms to 300ms the moment anyone in the house starts a download. It happens because your router is queuing packets in oversized buffers instead of dropping them. The fix is smart queue management (SQM) Firewalla, OpenWrt’s CAKE, or the built-in SQM features on Ubiquiti and MikroTik gear all do this. Run a bufferbloat test on DSLReports or Waveform before and after. The improvement is usually obvious enough that you stop doubting it.
Use wired Ethernet. Said it already, saying it again. Wi-Fi adds latency variance that no setting can fix.
Host near your players. Ping is physics. A server in the same city as your players beats a server two countries away every time, regardless of how good the hardware is.
Standing Up a Dedicated Server
Walking through the most common scenario you want to host a Minecraft, Valheim, or similar server for a small group.
Pick Where it Lives
Two real options:
- Home hosting. A spare PC or even a Raspberry Pi. Free, but it ties up your home internet and exposes your IP unless you tunnel.
- VPS or dedicated. Rent from Contabo, Hetzner, OVH, or DigitalOcean. Anywhere from $5 to $50 a month depending on what you need. Better for anything that’s meant to run all the time.
For most friend groups, a cheap VPS is the right answer. Home hosting is fine for occasional sessions but it’s a hassle to keep going.
Tunnel, Don’t Port Forward
If you’re hosting at home, don’t port forward unless you genuinely understand what you’re doing. Port forwarding puts your home IP out in public and opens an attack surface on your whole network.
Use a tunnel instead:
- playit.gg – popular for game servers, free tier handles small groups fine.
- Cloudflare Tunnel – more general-purpose, free, slightly more setup.
- Tailscale – secure and clean, but everyone needs to install the client.
The tunnel gives players a public address to connect to and your home IP stays invisible.
Install the Server Software
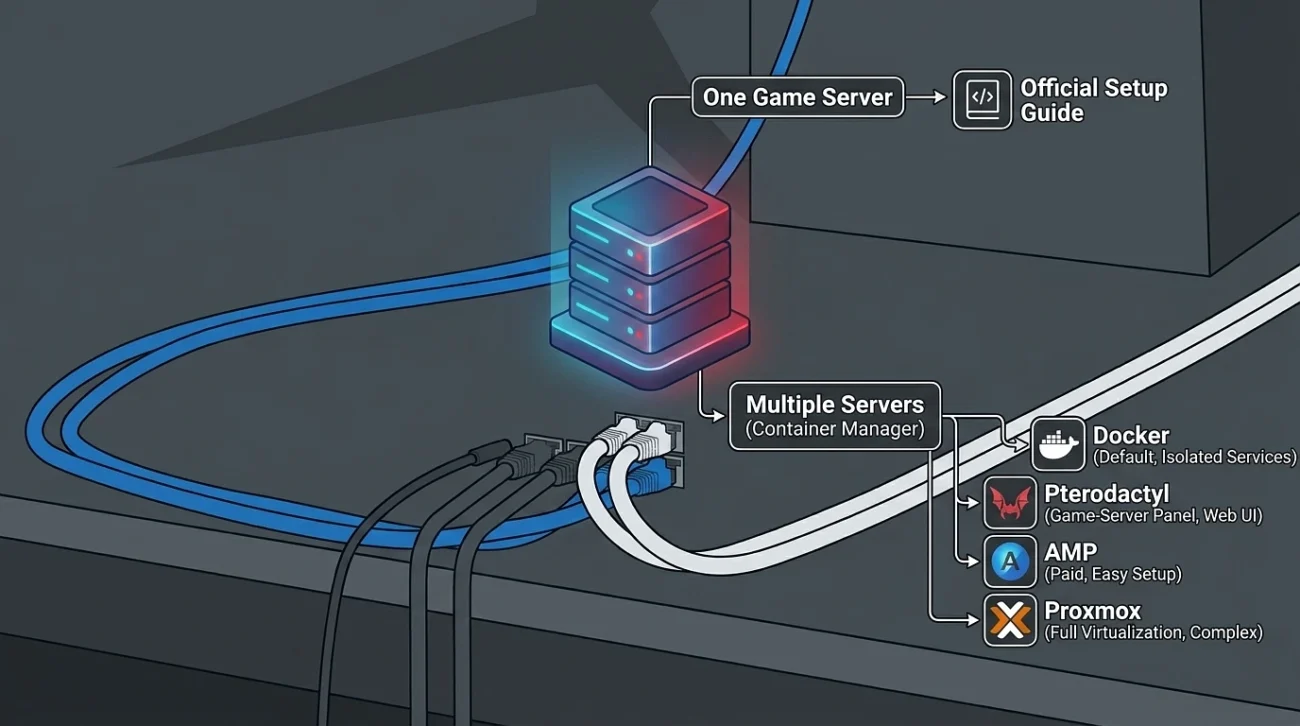
For one game server, follow the official setup guide for that game. For anything more, install a container manager so you can run multiple servers without them stepping on each other:
- Docker – the default way to run isolated services.
- Pterodactyl – game-server-specific control panel built on Docker, web UI for managing everything.
- AMP – paid alternative to Pterodactyl, easier first-time setup.
- Proxmox – full virtualisation, much more powerful but also much more complex.
First server? Pterodactyl is the easiest path to running multiple games cleanly without learning Docker first.
Whitelist Your Players
For games that support it (Minecraft, ARK, Valheim, most Source engine games), turn the whitelist on. Only players whose usernames or Steam IDs you’ve added can join. This single setting blocks more griefers and bots than every other security measure combined.
Lock the Server Down
Bare minimum, every time:
- Never run game servers as root. Make a dedicated user with limited permissions.
- Keep the OS and game software patched. Most exploits go for known, already-fixed issues.
- Use SSH keys instead of passwords for any remote access.
- Run a firewall ufw on Ubuntu is fine and only open the ports you actually need.
- Back up world data on a schedule. Servers crash. Drives fail. Mods misbehave.
Skip these and your server gets compromised. Not maybe. Eventually.
Running the Community on Top
Once the server runs, the network side is only half the job. The rest is the people connecting to it.
- Hub networks. If you’re running more than one Minecraft server say survival, creative, and minigames BungeeCord or Velocity lets you join them under one connection address. Players hit a single hub and pick where they go. Way cleaner than handing out three different IPs.
- Authentication. For most servers, in-game whitelisting is enough. For bigger communities, tools like Reown let users sign in with existing social or wallet logins instead of creating yet another account.
- Monitoring. You’ll want to know how the server’s actually being used. Built-in dashboards on platforms like PlayFab track retention, session length, and monetisation. For self-hosted setups, Grafana with Prometheus is the open-source standard overkill for tiny communities, essential once you grow.
Even basic logs who joined when, what commands got used, what crashed tell you a lot if you actually read them.